Fish_In_the_Canvas
Canvas Starter Guide v2.15.3
A node-structure walkthrough for creators new to the Canvas. It covers what each node is, what you actually write inside it, and how it behaves under the hood.
Parts of the platform's internals are deliberately undisclosed, so some of this is guesswork and some of it is simply wrong. Numbers change without notice. Keep the Canvas open and believe the Canvas over this document, every time.
Why o200k_base: StoryEngine creators were told the tokenization follows GPT-4o's scheme — note that's a statement about how tokens are counted, not a claim about which model runs underneath. o200k_base is GPT-4o's tokenizer, so the counts should line up. Treat it as a close estimate, not an exact match — this hasn't been verified side-by-side against the Canvas, and CJK text especially can differ between tokenizers. When it matters, trust the Canvas's own counter. (Tip from アヤイヤオ.)
What is the Canvas?
The Canvas is the workspace where you place and connect the nodes (blocks) that make up a story chat. Each node has a defined role, and you wire them together to create the flow of data.
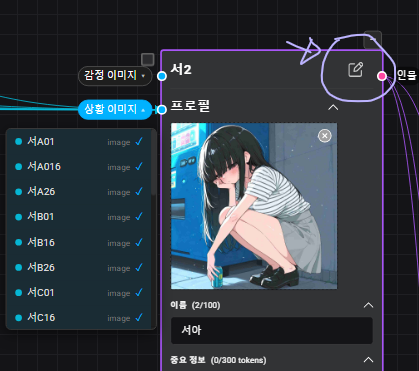
The two models — main and sub
StoryEngine runs on two AI models working together under the hood.
The sub-model is also understood to handle memory: summarising and managing the running conversation so older context stays usable. (This is the machinery the Info Management and Long-term Memory toggles in Advanced Settings switch off.) It's reportedly involved in variable management as well — worth knowing, since this side of the sub-model is easy to overlook and trips up new creators. (Reported by アヤイヤオ; the variable-management part isn't fully confirmed, and note the two-model split elsewhere in this guide describes variable update instructions as the main model's output.)
The Full Story chunks the sub-model retrieved, plus any keyword-matched macro (lorebook) entries, are added on top — and the response is generated from the combination.
Image tag output smile angry and variable update instructions are also the main model's job.
Full Story goes through the sub-model: semantic search, fetched only when the situation calls for it. It matches on meaning.
Macro Prompts does not touch the sub-model: exact keyword matching, injected directly. It fires when a specific word shows up, nothing fuzzier.
And separate from both, Core Context is injected into the main model every single turn — that's where your hard rules go.
Story node
The central node of the Canvas. Character, macro and achievement nodes all connect into it and get compiled together. What you write here reaches the main model first, at the highest priority.
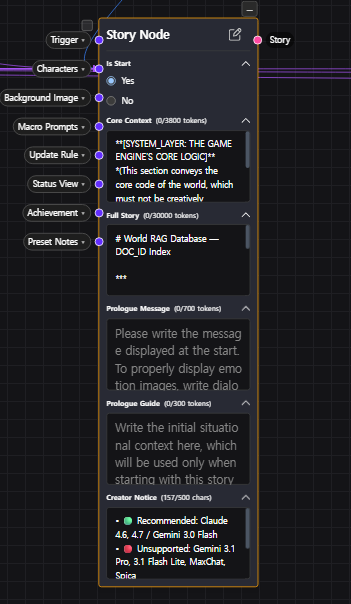
The fields you actually fill in:
| Field | Description |
|---|---|
| Is Start | Marks this node as a selectable starting point. Switch it on for each story node you want offered at the beginning — if more than one is set to Yes, the reader picks which opening situation to start from before the chat begins. This is how you offer several routes into the same story, so don't assume you're limited to one. |
| Core Context (2,000 tokens base) |
The hard-rules space. Directives the AI must always obey — SYSTEM_LAYER / WORLD_LAYER / DIRECTIVE and so on. The main model reads this before anything else. The budget is 2,000 tokens by default, and grows if you enable toggles in Advanced Settings. A canvas showing 3,800 has +1,800 worth of toggles switched on. |
| Full Story (30,000 tokens) |
The sub-model's retrieval space. Worldbuilding knowledge, location details, per-scene setup — all the bulk goes here. Unlike Core Context it is not always injected; the sub-model pulls from it as the situation calls for. The internal search method is undisclosed. |
| Prologue Message (700 tokens) |
The opening scene shown on the chat start screen — the first thing a user sees on entry. But it isn't only for the reader: the AI reads it too, and treats it as established opening context — which characters are present, what's already been set in motion, whether a macro should fire from the very first turn. So write it as a scene that primes the story, not just a greeting. A practical use of that: Prologue Guide is only 300 tokens, which gets tight. When first-turn setup won't fit there, creators often seed the overflow here instead — folding a hint or a bit of initial state into the prologue message, since the AI reads this anyway. |
| Prologue Guide (300 tokens) |
First-turn handling instructions given only to the AI. "Open the next turn this way," "initial variable values are these," and so on. Never shown to the user. |
| Creator Notice (500 chars) |
A note from you to your readers. Commonly used to state which models the story was tuned for and which ones misbehave with it — worth filling in, since readers can pick their own model. |
A common pattern is to instruct the model, from Core Context, to end each reply with a code block summarising the current state — stats, relationship values, what each character is thinking. This is not the Status View node, which is a separate side panel; this block is written by the model as part of its own output, because you told it to in Core Context.
Since a language model writes top to bottom, where you ask for that block decides what it can draw on.
At the end of the reply (the usual choice): the scene is already written by the time the model reaches the block, so the values are derived from the prose immediately above. State follows narration — the numbers describe what just happened.
At the start: the block is committed before the prose exists, so the figures come first and the narration is written to justify them. Neither is wrong — they simply run in opposite directions, and it's worth knowing which one you're asking for.
Because a node set to No isn't unused — it's a branch destination you arrive at mid-chat. See Scenario branching below.
Character node
One node per NPC. Appearance, personality, speech style, relationships — every piece of character information lives here. Connect it to a story node and the main model becomes aware of that character.
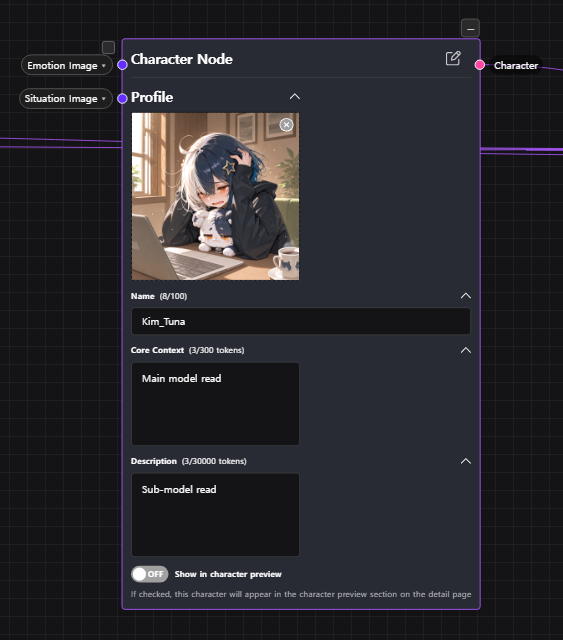
| Field | Description |
|---|---|
| Name (100 chars) |
The character's display name. Non-Latin scripts are fine. |
| Core Context (300 tokens) |
Shown in the key-information panel. Keep it to essential attributes only — name, age, gender. The budget is small on purpose, so spending tokens carefully here matters. |
| Description / Full Story (30,000 tokens) |
The same sub-model retrieval space as the story node's, though it's understood to be classified differently internally (exact behavior undisclosed). Keep it to character-related material only — personality, speech patterns, behavior, backstory, relationships. |
| Show in character preview | Whether this character appears in the preview section on the detail page. Usually left off for characters meant to be discovered in play. |
| title | An internal code label, just for your own sorting. e.g. KMR |
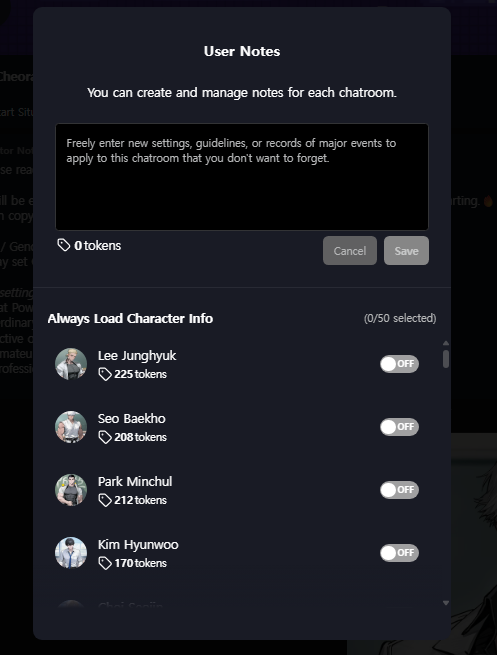
The reader-side fix is Always Load Character Info, in the User Notes menu: the reader can pin specific characters to load every time (up to 50). Two things worth knowing as an author: it's the reader who toggles this, not you — and each pinned character spends the reader's own token budget (the same 2,000 shared with User Notes and persona), by the per-character token amount shown next to each name. So a big cast that leans on this quietly costs the reader tokens.
The practical takeaway: if you can tell your story with 20 characters or fewer, do — it sidesteps the random-load problem entirely. Above 20, expect to guide readers toward pinning the essential few.
Macro Prompts (Lorebook)
Keyword-triggered injected memory. Write entries inside a macro prompt node, and when a registered keyword appears in user input, that entry's content is injected directly into the main context — no sub-model reads or reworks it in between. This is exact keyword matching, not similarity search: an entry fires when its trigger word shows up, nothing fuzzier than that.
Unlike story and character nodes, which are always present, the macro prompt is injected dynamically based on what's happening.
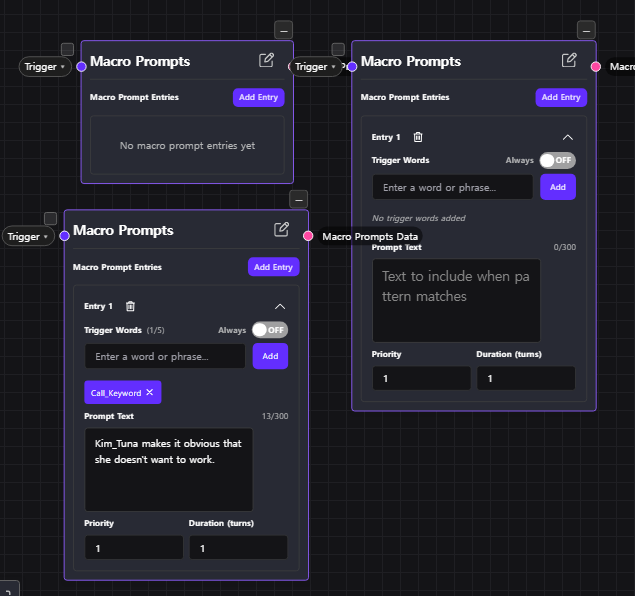
What one entry consists of:
| Field | Description |
|---|---|
| Trigger Words (up to 5) |
The keywords that fire this entry. Add them one at a time; each becomes its own chip. |
| Always | Injects the entry every turn, ignoring keywords entirely. Use sparingly — it permanently occupies one of the five slots. |
| Prompt Text (300 tokens) |
The actual content injected when the entry fires. |
| Priority | Higher values win the five slots first. OOC and system rules are typically set around 99–100. |
| Duration (turns) | How many turns the injection persists. Usually 1. |
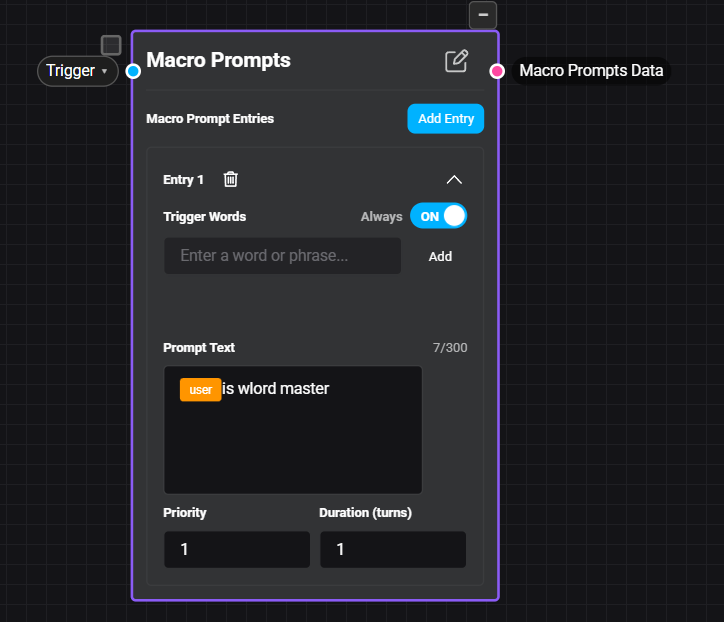
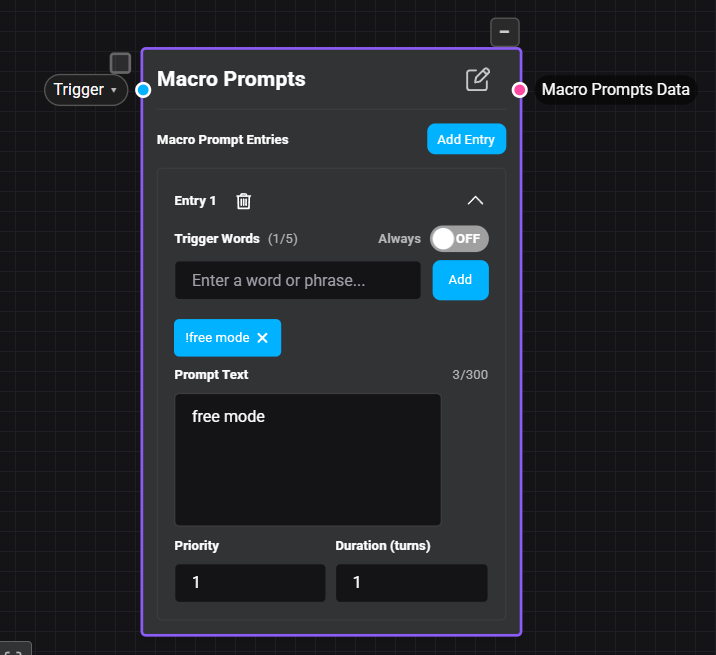
Image node
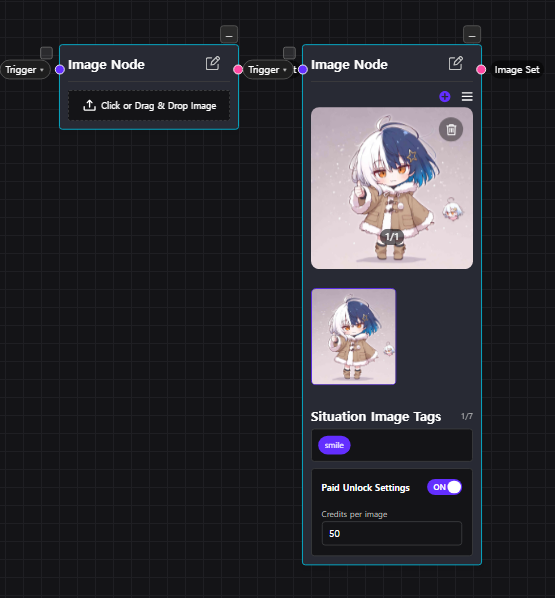
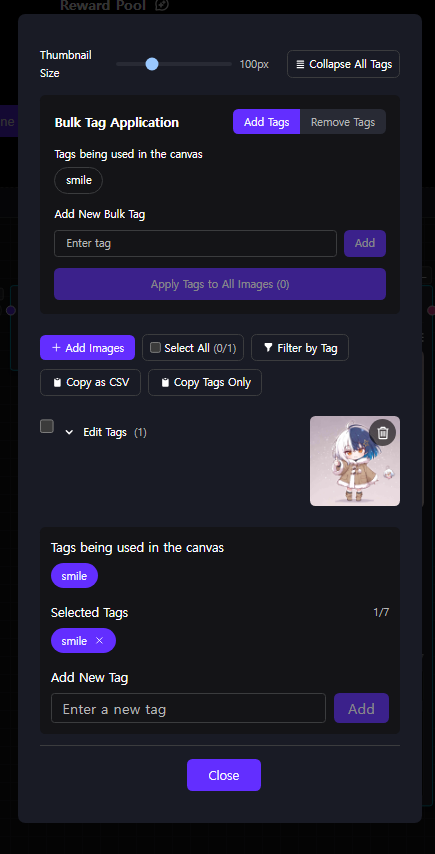
Manages the image set shown for a character. Each image is bound to a tag, and the main model's tag output decides which image gets displayed. Image nodes connect to character nodes.
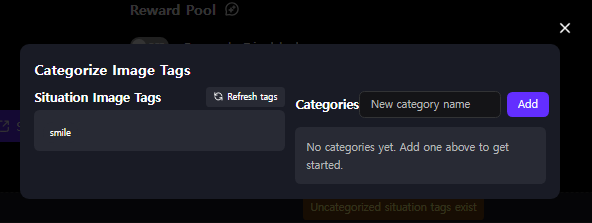
Categorize Image Tags
Images on StoryEngine behave as an independent module, not an extension of your prompt. So for the AI to know which image suits which moment, you have to sort your tags into categories and write the descriptions yourself.
Found under the top menu: Canvas → Categorize Image Tags.
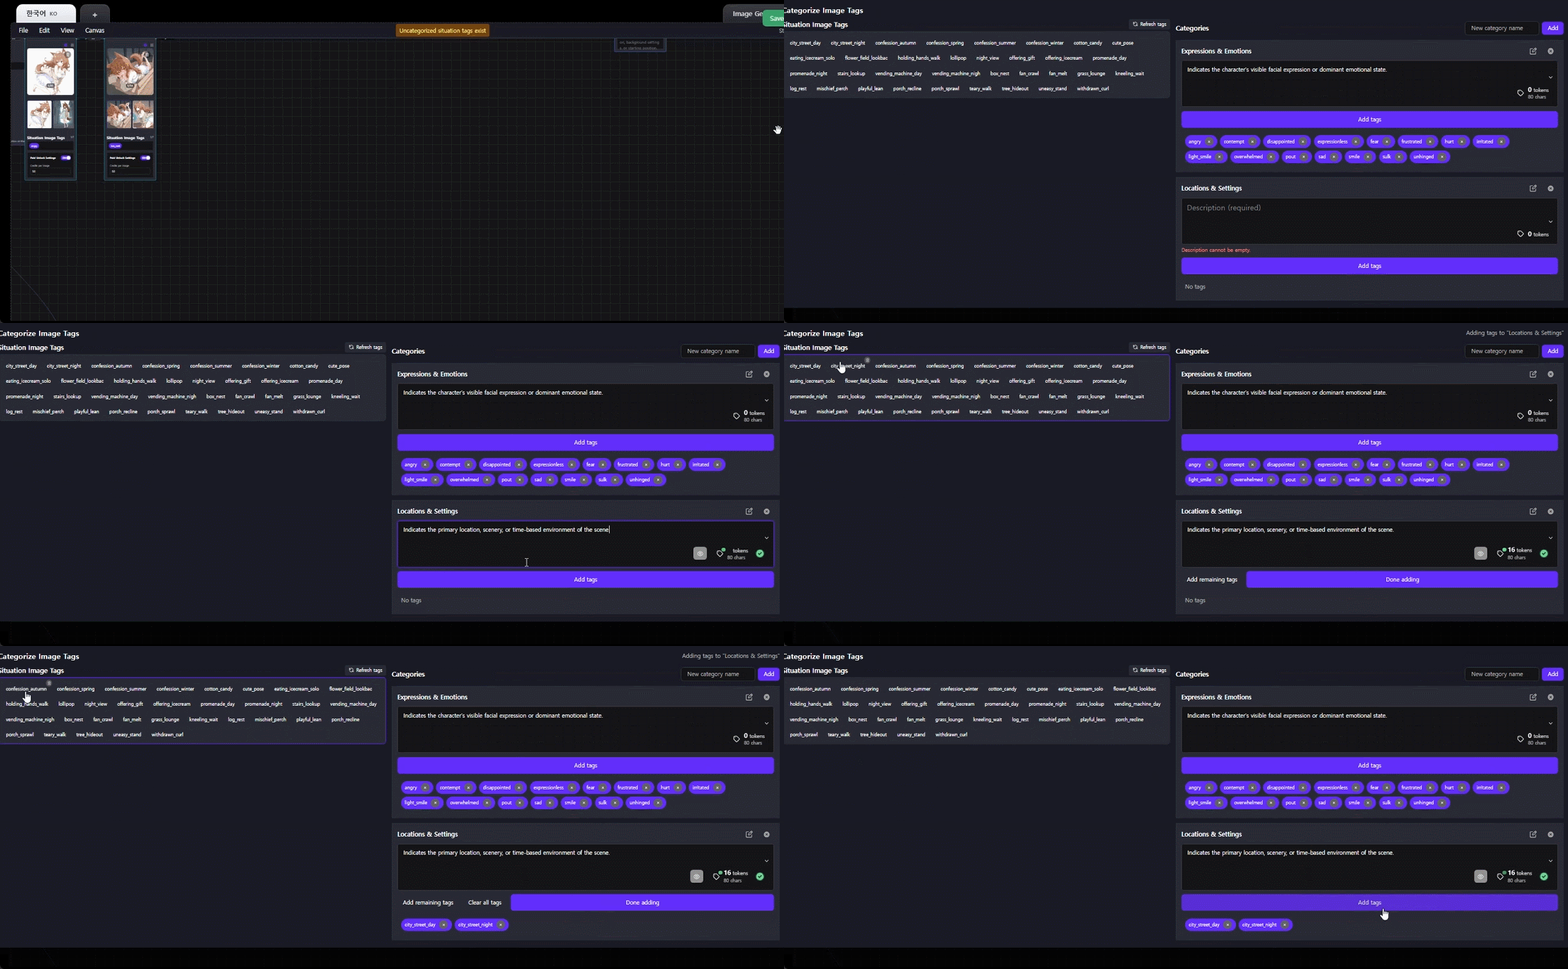
The order to do it in:
| Step | What to do |
|---|---|
| 1. Create a category | Type a name and add it. e.g. Emotions Locations Activities |
| 2. Write the description | In under 25 tokens, state when and in what situation the category applies. The AI reads this to decide which image to reach for. |
| 3. Assign tags | Add the tags from your image nodes into the matching category. e.g. Emotions → smile angry sad |
Variable node
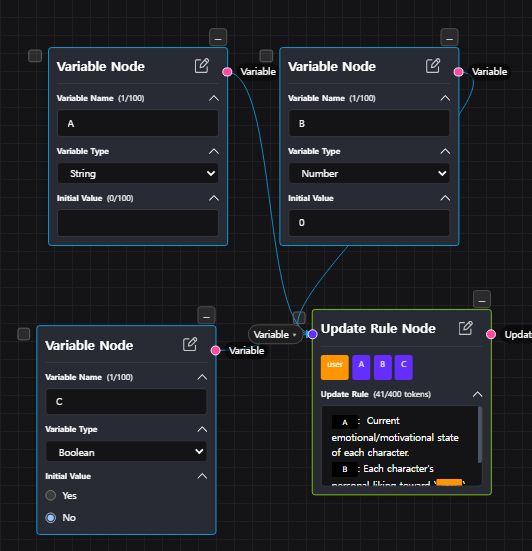
Stores a value tracked across the chat. Boolean, number and string types are supported. Variables are either read by a trigger node to test a condition, or displayed in a custom status view.
| Field | Description |
|---|---|
| Variable Name (100 chars) |
The variable's identifier. A var_ prefix makes it readable from a status view HTML panel as {{var_NAME}}.The prefix is only strictly required for status view display — without it, trigger and achievement wiring still works. But there's more to it (see the note below), so prefixing is worth doing as a habit. |
| Variable Type | Boolean Number String |
| Initial Value | Starting state. Boolean defaults to No, Number to 0, String to empty. |
| title | Internal code label. Matching it to the related trigger and achievement makes them easy to pair up later. e.g. A1 |
var_ prefix actually comes from. It isn't in the official documentation, and older builds didn't use it — it appears to have been introduced fairly recently. Looking into it: the prefix seems to exist to keep variable data from getting crossed during compilation as canvases grew larger and more crowded. In other words it's the same collision problem as above, addressed with a naming convention. Things still run without it, but prefixing is recommended. (Not officially confirmed — a definitive answer would need to come from the platform. Flagged by アヤイヤオ, checked together.)Trigger node
Fires an achievement when a variable meets a condition. It takes the story node and a variable node as inputs, and signals the connected achievement node when the condition is met. You only need a trigger when you want an achievement to unlock. A variable that merely tracks a value doesn't need one.
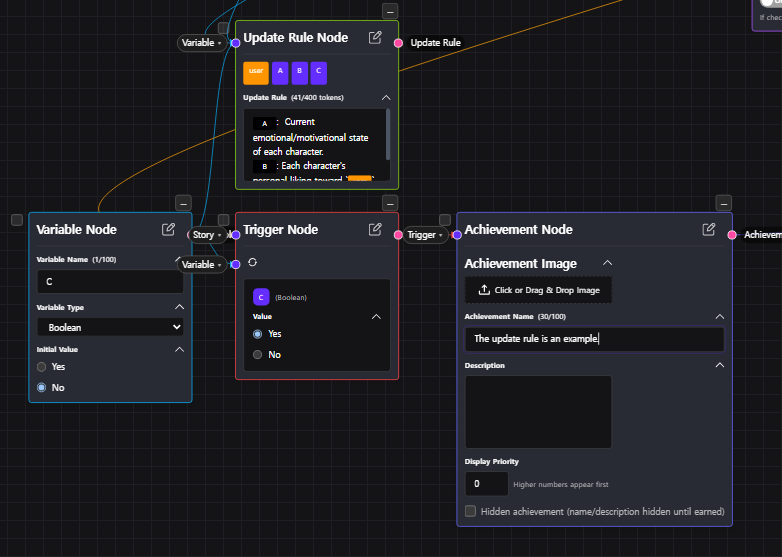
| Field | Description |
|---|---|
| Variable to watch | The variable this trigger monitors. Must match the name on the connected variable node. |
| Value | The trigger fires when the watched variable reaches this value. For a Boolean, usually Yes. |
| title | Use the same label as the paired variable and achievement. e.g. A1 |
Achievement node
A milestone shown to the reader when its trigger fires. Connect the achievement node back into the story node so the story itself can react to it having been earned.
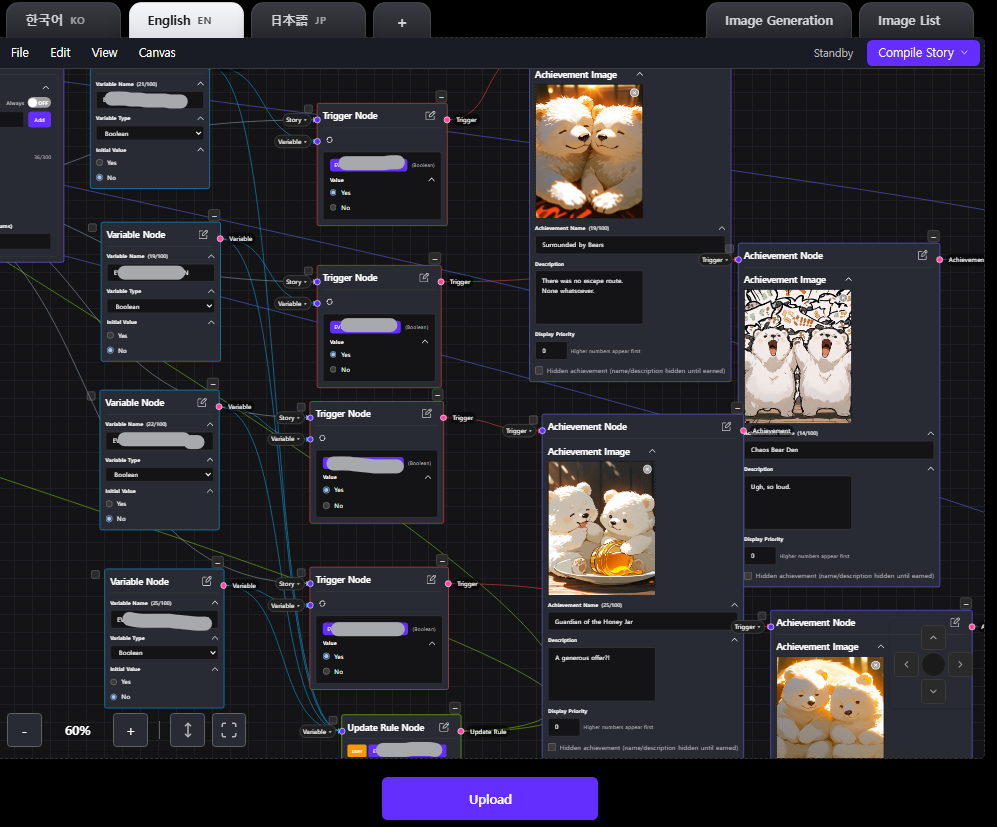
| Field | Description |
|---|---|
| Achievement Image | Optional artwork shown with the unlock. Click or drag-and-drop to set it. |
| Achievement Name (100 chars) |
The name the reader sees. |
| Description | Flavour text displayed when the achievement is earned. |
| Display Priority | Higher numbers appear first in the achievement list. Useful for putting story-critical unlocks at the top. |
| Hidden achievement | Hides both name and description until earned. Recommended for anything that would spoil the story. |
Scenario branching — multiple routes through one story
A story node set to Is Start: No isn't a leftover — it's a destination you arrive at partway through a chat. Wire a trigger into one, and when that trigger fires, the story hands off to it. The practical result is a visual-novel style route select: one work containing several distinct paths.
It's the same chain you already use for achievements, with one difference: the far end is a story node instead of an achievement node.
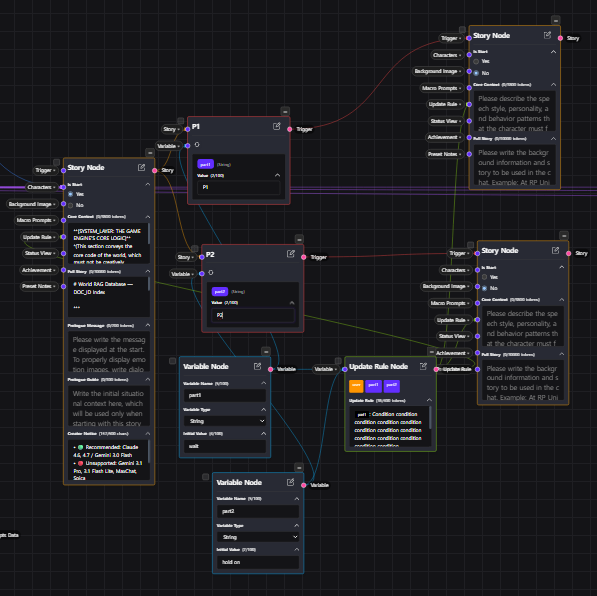
How it plays out in practice:
| Step | What happens |
|---|---|
| 1. Offer the choice | In your opening scenario, give the reader a way to pick. That might be an instruction to type a specific keyword, an in-character question, a menu written into the prologue — whatever suits the story. The reader's input is what drives this, so it has to be discoverable. |
| 2. Update the variable | Your update rule catches the input and writes the corresponding value into the variable. In the screenshot these are strings — part1 starting at wait, changing to P1 once the choice is made. |
| 3. Trigger fires | The trigger watching that variable sees its value and fires, exactly as it would for an achievement. |
| 4. Route opens | The story node behind the trigger takes over, and the chat continues from that node's context instead of the original one. That's the branch. |
Preset Notes — reader-toggled prompt modules
Preset notes are optional prompt blocks that you write and the reader switches on. Each one has an icon, a title, a short description the reader sees, and the prompt text that gets injected when it's enabled. Think of them as opt-in modifiers for your story — an extra mode, a content emphasis, a tone shift — that the reader chooses rather than you forcing.
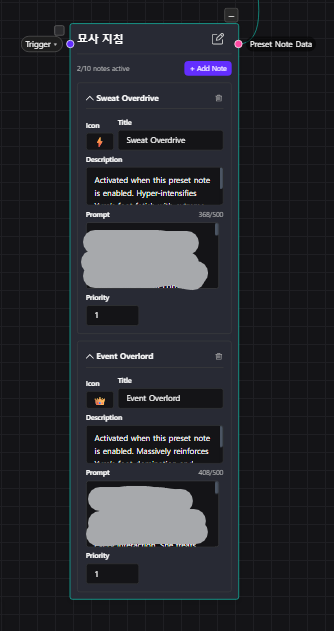
So a heavy preset note doesn't just crowd out the reader's own notes and persona — it can push them into paying more. (Budget figures reported by ㅇㅅㅇㅇㄴㄷ, who checked them after this section first went up with a wrong number in it.)
Two consequences fall out of that, and both matter when you're authoring:
| Consequence | What it means for you |
|---|---|
| Can't all run at once | You can define up to 10 preset notes, but the reader can't enable all of them together — each one consumed comes out of a finite budget, so they'll run out of room. Design them as choices, not a stack meant to be fully on. |
| Keep each one lean | A heavy preset note (real ones run ~370–410 tokens) eats a sizeable chunk of the shared 2,000 on its own. Several of them and the reader is well into that budget before writing a single word of their own persona. If a note has to be big, make sure it earns the cost. |
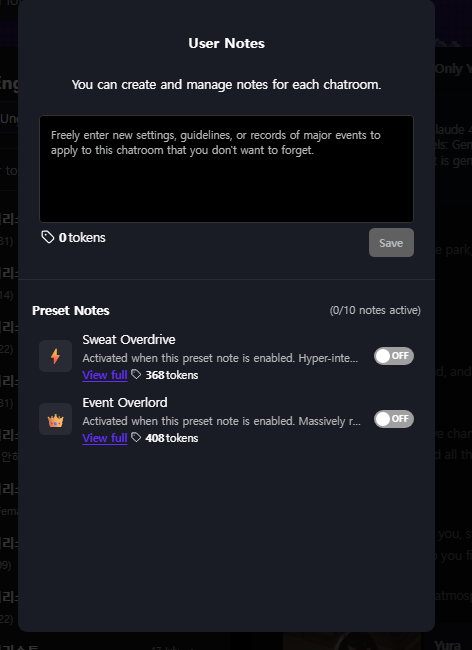
| Field | Description |
|---|---|
| Icon | A small emoji shown next to the note in the reader's list. |
| Title | The note's name, as the reader sees it in the toggle list. |
| Description | A short line explaining what enabling this note does — shown to the reader to help them decide. |
| Prompt (500 tokens) |
The text injected into context when the note is on. This is what actually spends the reader's tokens. |
| Priority | Ordering value among enabled notes. |
Other nodes
Supporting nodes you'll meet once the basics are in place. These are covered lightly on purpose — they're best learned by clicking on them and seeing what happens.
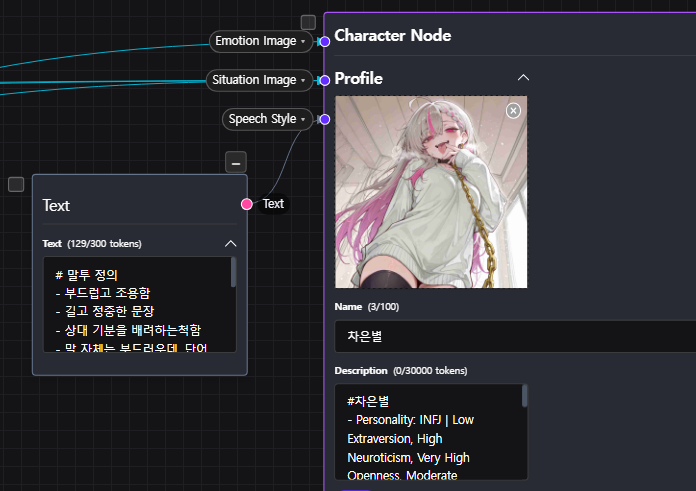
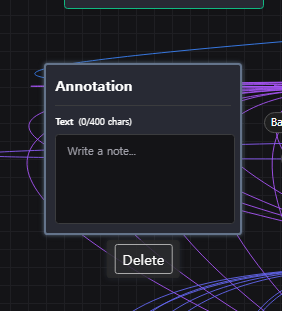
{{var_NAME}} syntax. Only variables carrying the var_ prefix are visible here. Don't confuse this with the summary code block some stories print at the end of each reply — that one is written by the model because Core Context told it to, and is covered up in Story node.This is what became of the old Text node. That one used to have a port and fed the character node's system part (speech style and the like); that role has since been folded into the character node itself, and the leftover node was repurposed into this note-only Annotation. If you remember a connectable Text node, this is where it went.
Advanced Settings
A panel that switches off parts of StoryEngine's built-in behavior. Every toggle is OFF by default, and OFF means the feature is in use. Switching one ON disables the thing named. Read them literally — "Turn off X" set to ON means X is now off.
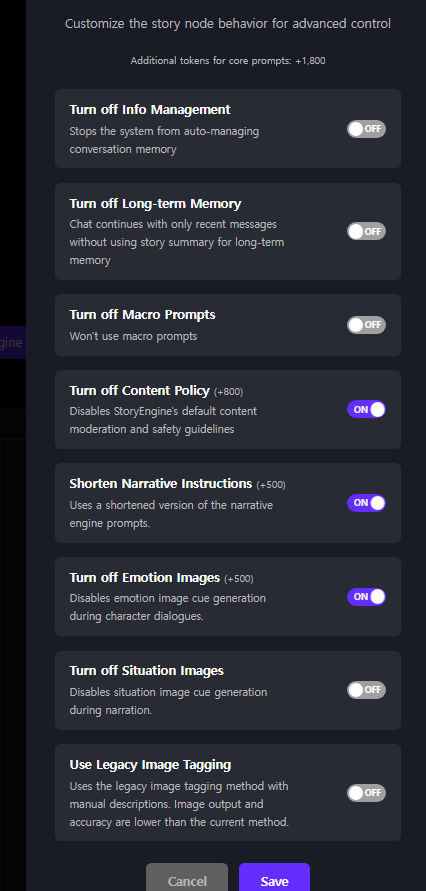
Every bonus below was measured one toggle at a time. Switching on all seven that carry a bonus adds +5,500, which takes Core Context from 2,000 up to 7,500 tokens — nearly four times the default. Use Legacy Image Tagging changes no budget at all, since it swaps a method rather than removing a prompt.
| Toggle | What switching it ON does |
|---|---|
| Turn off Info Management +800 | Stops the system auto-managing conversation memory. In practice it also disables the retrieval that keeps older context available, which is the larger consequence. Readers tend to hit long-term memory problems partway through a chat. Leave it alone unless you know exactly why you want it off. |
| Turn off Long-term Memory +1,200 | The chat continues on recent messages only, without drawing on the story summary. Be aware: the observable symptoms overlap heavily with Info Management above, and the two have never been cleanly told apart from the outside. Treat them as related rather than independent. |
| Turn off Macro Prompts +1,200 | Disables macro prompts — meaning your macro prompts stop firing entirely. Unambiguous, unlike the two above. |
| Turn off Content Policy +800 | Disables StoryEngine's default content moderation and safety guidelines. Conceptually paired with Shorten Narrative Instructions below — both strip out vendor-supplied baseline prompting. Largest token refund of the set. Platform rules still apply either way. The toggle changes prompting, not your obligations — regional title restrictions, terms of service and moderation of published work all remain in force. |
| Shorten Narrative Instructions +500 | Uses a condensed version of the narrative engine prompts. These vendor defaults handle plot scaffolding and general storytelling posture, and they're deliberately broad — which suits most creators fine. If you're writing your own tight core logic, though, that generic layer works against you. Commonly enabled by creators doing heavy custom prompt work. |
| Turn off Emotion Images +500 | Stops emotion image cues during character dialogue. Normally the character profile area calls an image whenever an emotion is detected in the exchange. That detection is computationally expensive, and creators who don't need per-emotion portraits often switch it off for that reason alone. |
| Turn off Situation Images +500 | The same idea applied to situation image cues during narration, rather than character emotion. |
| Use Legacy Image Tagging no change | Don't. Reverts to the old manual-description tagging method; output quality and accuracy are both worse. The real cost is that failures become unexplainable — calls that look entirely correct still don't behave, with nothing telling you why. Leave this off. |
Publish settings — the page outside the Canvas
These fields live outside the Canvas and don't affect the AI at all. They're the storefront: what a reader sees before they ever press start. Most creators ignore this page entirely until the Canvas work is finished, which is why it's last here too.
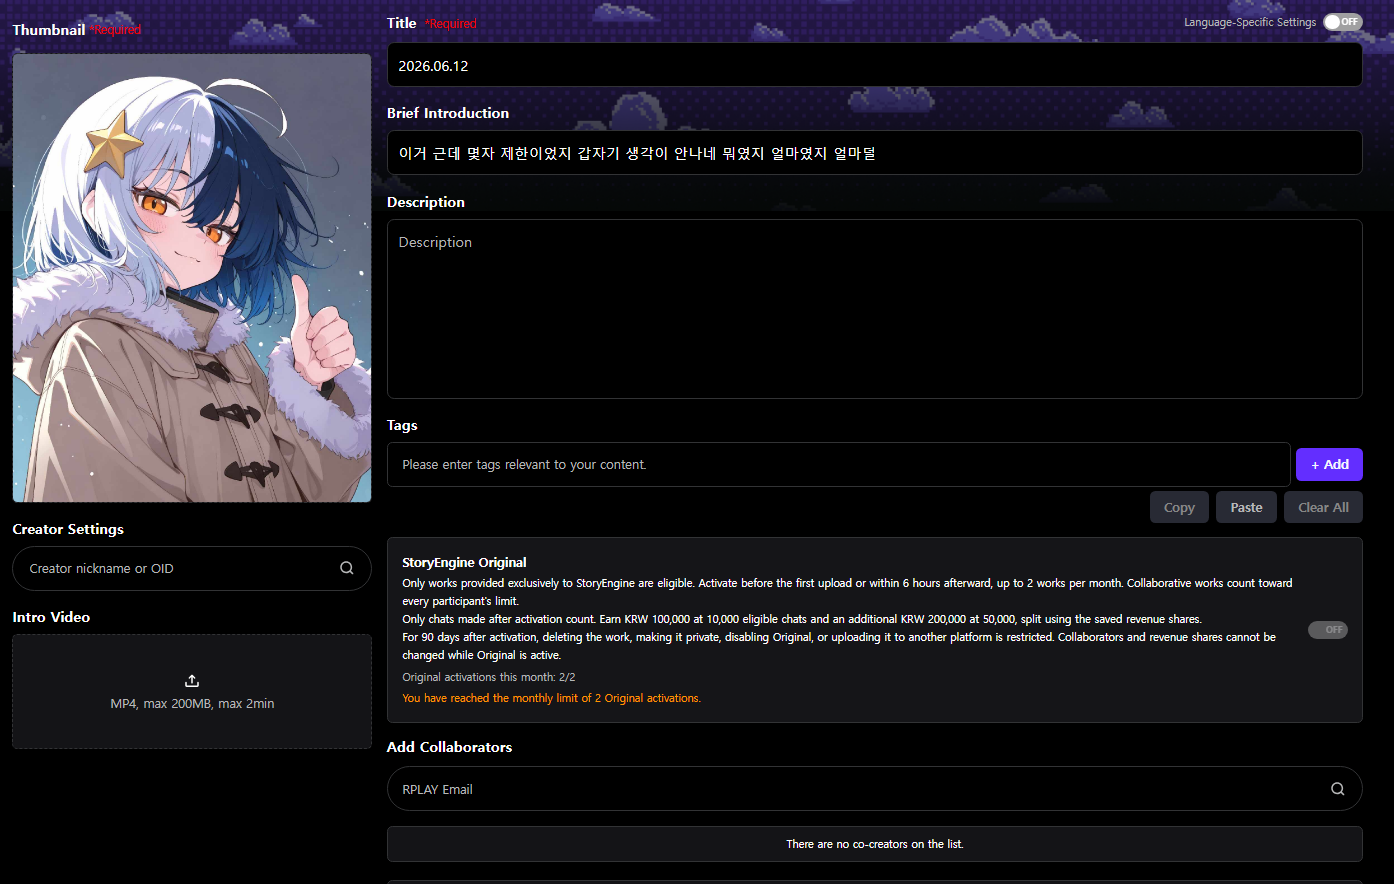
| Field | What to know |
|---|---|
| Title | The story's name. If you plan to localize: on the KR side, explicitly crude or vulgar phrasing in a title is not permitted. Pick something that survives the trip. |
| Brief Introduction | 40-character limit. It's a one-line hook, not a summary. Easiest to write last, once you know what the story actually became. |
| Description | Supports a minimal subset of Markdown: bold, a little font-size control, simple tables, and externally hosted images. Don't expect full Markdown — anything fancier won't render. Images must be hosted elsewhere and linked in. |
| Tags | You can dump in every tag across every supported language at once. The platform automatically surfaces only the tags matching the viewer's language, so there is no downside to tagging in all of them. Do it. |
| Thumbnail | 4:5 ratio. WebP uploads are allowed up to 5 MB (raised from the old ~2–3 MB ceiling in a mid-2026 platform update). GIF was last confirmed near 10 MB. Note the platform's own caveat: high-file-size or multi-frame images may lose some quality in the shrunk thumbnail shown on the main screen. If an upload fails without explanation, size is still the first thing to check. |
| Intro Video | MP4, max 200MB, hard 2-minute cap. No leniency on the length — trim before uploading. |
| Add Collaborators | Enter another creator's StoryEngine account email to bring them onto the work. You control whether they get Canvas access, and revenue can be split in 10% increments. |
| Creator Settings | Chooses which collaborator is shown as the representative creator. Takes a creator nickname or OID. |
| StoryEngine Original | An opt-in exclusivity designation for works provided exclusively to StoryEngine. The terms were overhauled in mid-2026 — if you've read older guidance describing a percentage-point settlement bonus, that is no longer how it works. The wording below was cross-checked by a creator in the English-language region and came back identical, so it isn't KR-only. Activating: switch it on before the first upload, or within 6 hours after. Limited to 2 works per month, and a collaborative work counts against every participant's monthly limit. Reward: paid at fixed milestones rather than as a rate bonus — KRW 100,000 at 10,000 eligible chats, plus a further KRW 200,000 at 50,000, divided according to the work's saved revenue shares. Only chats that happen after activation count, so activating late costs you everything before that point. Locked for 180 days: you cannot delete the work, make it private, turn Original off, or upload it elsewhere. Collaborators and revenue shares also cannot be changed while Original is active — settle those before you activate. Do not try to game this. The operations team has stated plainly that workarounds — publishing elsewhere first and staggering the upload here, or re-uploading the same build under a different name — result in a ban, no exceptions. |
This trips people up constantly: a work gets its main-page visibility pulled, or gets flagged, and the creator didn't know a rule existed. The platform operates under different legal environments in different regions, so the exact rules are not the same everywhere. The single most important habit is to read the activity guidelines for your own region before you publish — the summary below is a starting point, not a substitute for the current official text.
— Korea (KR) —
Based on the RPLAY activity guidelines. A thumbnail that hits any of the following has its main-page exposure restricted:
- Thumbnails should be composed mainly of the upper body.
- No exposure of genitals, pubic hair, or anus.
- No nipple exposure in photorealistic images.
- No depiction of semen or semen-suggesting fluids.
- No images depicting or evoking direct sexual intercourse (whether mosaic-censored or not).
- No dildos / genital-shaped sex toys.
- No copyright-infringing images; nothing excessively provocative, hateful, or discriminatory.
Titles and hashtags have their own restricted-word and required-tag lists (certain explicit terms restrict main-page exposure; certain special settings and identity tags are required). Read the current guideline text for the specifics — the lists change.
— Japan (JP) —
When asked (last year), the answer given was that standards follow published-media (publication) censorship norms. That's a different bar from KR, and it may have shifted since. Check directly against current publication standards before you publish rather than assuming the KR rules carry over.
— English-speaking region (EN) —
There are almost certainly applicable laws and platform rules here too. The specifics aren't spelled out in this guide, so confirm your own region's rules before publishing — "it wasn't removed last time" is not a rule.
Why this matters beyond your own account: content that breaks the law in a given region puts the platform itself at legal risk, which is exactly why these regional rules exist and why they're enforced. Following them protects the space everyone publishes in. These specifics are "last confirmed," not official text — when in doubt, the platform's own current guidelines win.
To be precise about what this is: a creator-to-creator cross-check, not a statement from the company. It's good evidence that the panel reads the same across regions, but if you spot a difference on your account, please say so.
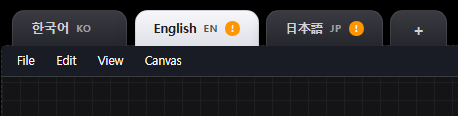
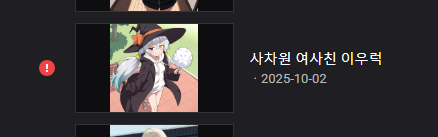
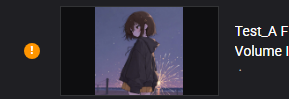
The same badge now shows up in your creator work list too (a very recent addition — it wasn't there earlier the same day). So you can spot which works need attention without opening each canvas: an orange (!) beside a work means it needs compiling, a red (!) means it has an error. Same colour meaning as the tabs, just surfaced one level up.
Not comfortable writing in English? Open the issue in your own language and say which one it is — Korean, English, Japanese, and Spanish are all fine, and I'll do my best to reply in the language you wrote in. A rough machine translation is completely welcome too; I'd rather have the report than have you skip it over the language.
Now go open the Canvas and press things.
Contributors
Most of what's accurate in this guide got that way because other creators took the time to correct it, test it, or translate it. Named here with thanks:
| ㅇㅅㅇㅇㄴㄷ | Scenario-branching technique; corrected the reader token budget (2,000 shared with persona). |
| Scoot | Cross-checked the StoryEngine Original terms from the English-language region. |
| アヤイヤオ | Sub-model's memory/variable roles; the token-counter tip; prologue message doubling as AI-read context; and the port-connect list being universal across nodes; distinctive trigger words. |
| yatoming | Native-speaker review of the Japanese edition's phrasing. |
| 夢見月ひいな | Caught the Original lock period changing from 90 to 180 days. |
| Mukmul | Screenshots for the Always toggle and using a macro keyword as a mode switch. |
| NAFE | Screenshot of Always Load Character Info from a 20+ character story. |
| トリ(STORY ENGINE) | Flagged the new compile-status badge on the language tabs. (Not an official account, despite the name.) |
If you reported something and aren't listed, or want your name shown differently, tell me — the omission is an oversight, not a slight.